How to Build a Simple Website with HTML CSS and JavaScript – Building a website from scratch is an empowering skill that opens doors to countless creative and professional opportunities. With just three core technologies—HTML, CSS, and JavaScript—you can create a fully functional website that showcases your ideas, products, or services to the world. This guide will walk you through each step of the process, from setting up your development environment to publishing your finished site.
Table of Contents
Getting Started: What You’ll Need
Before diving into code, let’s gather the essentials:
- A text editor (VS Code, Sublime Text, or even Notepad)
- A web browser (Chrome, Firefox, Safari, or Edge)
- Basic understanding of file management
- Enthusiasm and patience
No expensive software or specialized hardware required—just these simple tools and your creativity.
Understanding the Three Pillars of Web Development
HTML: The Structure
HTML (HyperText Markup Language) forms the foundation of every website. Think of it as the skeleton that gives your website its basic structure. HTML uses tags to define elements like headings, paragraphs, images, and links.
Here’s a simple HTML example:
<!DOCTYPE html>
<html>
<head>
    <title>My First Website</title>
    <meta name="description" content="Learn how to build a simple website with HTML, CSS, and JavaScript">
</head>
<body>
    <h1>Welcome to My Website</h1>
    <p>This is my first paragraph.</p>
    <img src="image.jpg" alt="A descriptive text">
    <a href="https://example.com">Visit Example</a>
</body>
</html>
CSS: The Style
CSS (Cascading Style Sheets) controls how your HTML elements look. It handles layout, colors, fonts, spacing, and responsive design. Without CSS, your website would appear as plain text with basic formatting.
A simple CSS example:
body {
    font-family: Arial, sans-serif;
    background-color: #f4f4f4;
    margin: 0;
    padding: 20px;
}

h1 {
    color: #333;
    text-align: center;
}

p {
    line-height: 1.6;
    color: #666;
}
JavaScript: The Behavior
JavaScript adds interactivity to your website. It enables functionalities like form validation, animations, data fetching, and dynamic content updates. While a simple website can function without JavaScript, adding it creates a more engaging user experience.
A basic JavaScript example:
document.addEventListener('DOMContentLoaded', function() {
    const button = document.querySelector('#changeColorBtn');
    const heading = document.querySelector('h1');

    button.addEventListener('click', function() {
        heading.style.color = getRandomColor();
    });

    function getRandomColor() {
        const letters = '0123456789ABCDEF';
        let color = '#';
        for (let i = 0; i < 6; i++) {
            color += letters[Math.floor(Math.random() * 16)];
        }
        return color;
    }
});
Building Your First Web Page
Let’s put these technologies together to create your first web page.
Step 1: Create Your Project Structure
First, create a folder for your website project with the following structure:
my-website/
├── index.html
├── css/
│   └── style.css
└── js/
    └── script.js
Step 2: Create the HTML File
Open your text editor and create a new file named index.html. This will be your homepage. Add the following code:
<!DOCTYPE html>
<html lang="en">
<head>
<meta charset="UTF-8">
<meta name="viewport" content="width=device-width, initial-scale=1.0">
<title>My Simple Website</title>
<meta name="description" content="Learn how to build a simple website with HTML, CSS, and JavaScript">
<link rel="stylesheet" href="css/style.css">
</head>
<body>
<header>
<nav>
<ul>
<li><a href="#home">Home</a></li>
<li><a href="#about">About</a></li>
<li><a href="#projects">Projects</a></li>
<li><a href="#contact">Contact</a></li>
</ul>
</nav>
</header>
<main>
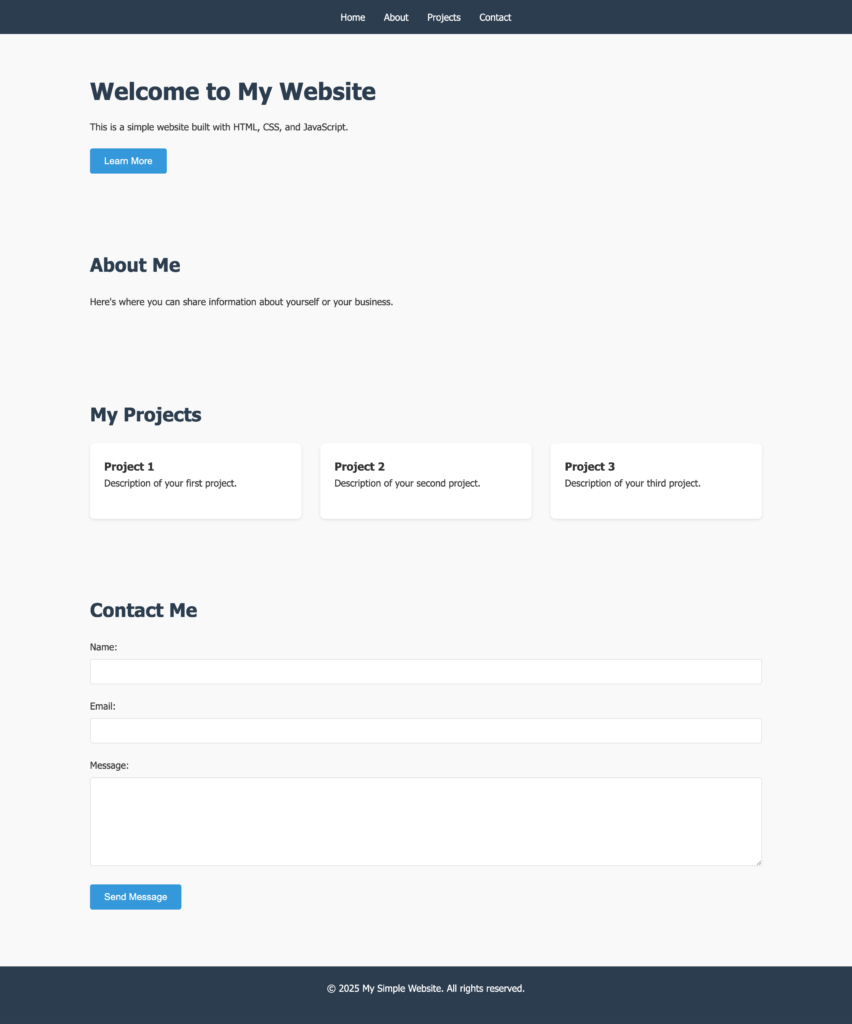
<section id="home">
<h1>Welcome to My Website</h1>
<p>This is a simple website built with HTML, CSS, and JavaScript.</p>
<button id="ctaButton">Learn More</button>
</section>
<section id="about">
<h2>About Me</h2>
<p>Here's where you can share information about yourself or your business.</p>
</section>
<section id="projects">
<h2>My Projects</h2>
<div class="project-grid">
<div class="project-card">
<h3>Project 1</h3>
<p>Description of your first project.</p>
</div>
<div class="project-card">
<h3>Project 2</h3>
<p>Description of your second project.</p>
</div>
<div class="project-card">
<h3>Project 3</h3>
<p>Description of your third project.</p>
</div>
</div>
</section>
<section id="contact">
<h2>Contact Me</h2>
<form id="contactForm">
<div class="form-group">
<label for="name">Name:</label>
<input type="text" id="name" required>
</div>
<div class="form-group">
<label for="email">Email:</label>
<input type="email" id="email" required>
</div>
<div class="form-group">
<label for="message">Message:</label>
<textarea id="message" required></textarea>
</div>
<button type="submit">Send Message</button>
</form>
</section>
</main>
<footer>
<p>© 2025 My Simple Website. All rights reserved.</p>
</footer>
<script src="js/script.js"></script>
</body>
</html>
Step 3: Style Your Page with CSS
Now, create a file named style.css in the css folder and add these styles:
/* Base styles */
* {
    margin: 0;
    padding: 0;
    box-sizing: border-box;
}

body {
    font-family: 'Segoe UI', Tahoma, Geneva, Verdana, sans-serif;
    line-height: 1.6;
    color: #333;
    background-color: #f9f9f9;
}

/* Navigation */
header {
    background-color: #2c3e50;
    padding: 1rem 0;
    position: sticky;
    top: 0;
    z-index: 100;
}

nav ul {
    display: flex;
    justify-content: center;
    list-style: none;
}

nav ul li {
    margin: 0 1rem;
}

nav ul li a {
    color: white;
    text-decoration: none;
    font-weight: 500;
    transition: color 0.3s;
}

nav ul li a:hover {
    color: #3498db;
}

/* Sections */
section {
    padding: 4rem 2rem;
    max-width: 1200px;
    margin: 0 auto;
}

h1 {
    font-size: 2.5rem;
    margin-bottom: 1rem;
    color: #2c3e50;
}

h2 {
    font-size: 2rem;
    margin-bottom: 1.5rem;
    color: #2c3e50;
}

p {
    margin-bottom: 1.5rem;
}

/* Buttons */
button {
    background-color: #3498db;
    color: white;
    border: none;
    padding: 0.75rem 1.5rem;
    font-size: 1rem;
    cursor: pointer;
    border-radius: 4px;
    transition: background-color 0.3s;
}

button:hover {
    background-color: #2980b9;
}

/* Projects section */
.project-grid {
    display: grid;
    grid-template-columns: repeat(auto-fill, minmax(300px, 1fr));
    gap: 2rem;
}

.project-card {
    background-color: white;
    padding: 1.5rem;
    border-radius: 8px;
    box-shadow: 0 2px 5px rgba(0, 0, 0, 0.1);
    transition: transform 0.3s, box-shadow 0.3s;
}

.project-card:hover {
    transform: translateY(-5px);
    box-shadow: 0 5px 15px rgba(0, 0, 0, 0.1);
}

/* Contact form */
.form-group {
    margin-bottom: 1.5rem;
}

label {
    display: block;
    margin-bottom: 0.5rem;
    font-weight: 500;
}

input, textarea {
    width: 100%;
    padding: 0.75rem;
    border: 1px solid #ddd;
    border-radius: 4px;
    font-family: inherit;
}

textarea {
    min-height: 150px;
}

/* Footer */
footer {
    background-color: #2c3e50;
    color: white;
    text-align: center;
    padding: 1.5rem;
    margin-top: 2rem;
}

/* Responsive design */
@media (max-width: 768px) {
    nav ul {
        flex-direction: column;
        align-items: center;
    }

    nav ul li {
        margin: 0.5rem 0;
    }

    .project-grid {
        grid-template-columns: 1fr;
    }
}
Step 4: Add Interactivity with JavaScript
Finally, create a file named script.js in the js folder and add this code:
document.addEventListener('DOMContentLoaded', function() {
    // Smooth scrolling for navigation links
    document.querySelectorAll('nav a').forEach(anchor => {
        anchor.addEventListener('click', function(e) {
            e.preventDefault();

            const targetId = this.getAttribute('href');
            const targetSection = document.querySelector(targetId);

            window.scrollTo({
                top: targetSection.offsetTop - 70,
                behavior: 'smooth'
            });
        });
    });

    // CTA button effect
    const ctaButton = document.getElementById('ctaButton');
    if (ctaButton) {
        ctaButton.addEventListener('click', function() {
            document.querySelector('#about').scrollIntoView({
                behavior: 'smooth'
            });
        });
    }

    // Form validation and submission
    const contactForm = document.getElementById('contactForm');
    if (contactForm) {
        contactForm.addEventListener('submit', function(e) {
            e.preventDefault();

            // Get form values
            const name = document.getElementById('name').value;
            const email = document.getElementById('email').value;
            const message = document.getElementById('message').value;

            // Simple validation
            if (name && email && message) {
                // In a real website, you would send this data to a server
                alert(`Thank you, ${name}! Your message has been received. We'll contact you at ${email} soon.`);
                contactForm.reset();
            }
        });
    }

    // Add animation to project cards
    const projectCards = document.querySelectorAll('.project-card');
    if (projectCards.length > 0) {
        const observer = new IntersectionObserver((entries) => {
            entries.forEach(entry => {
                if (entry.isIntersecting) {
                    entry.target.style.opacity = 1;
                    entry.target.style.transform = 'translateY(0)';
                }
            });
        });

        projectCards.forEach(card => {
            card.style.opacity = 0;
            card.style.transform = 'translateY(20px)';
            card.style.transition = 'opacity 0.5s, transform 0.5s';
            observer.observe(card);
        });
    }
});
Testing Your Website Locally
To see your website in action:
- Open your project folder
- Double-click on the
index.htmlfile to open it in your web browser - Alternatively, you can use the “Live Server” extension in VS Code for auto-reloading
Your browser should display your newly created website! As you make changes to your HTML, CSS, or JavaScript files, refresh the page to see the updates.
Taking Your Website Further
Now that you have a basic website, consider these enhancements:
- Responsive Design: Ensure your website looks good on all devices by using media queries in CSS
- Custom Fonts: Incorporate Google Fonts or other web fonts to enhance typography
- SEO Optimization: Add meta tags, semantic HTML, and proper heading structure
- Web Hosting: Deploy your website using services like GitHub Pages, Netlify, or Vercel
- Version Control: Use Git to track changes and collaborate with others
- Testing: Ensure your website works across different browsers and devices
Comparison of Popular Free Hosting Services
| Platform | Ease of Use | Features | Best For |
|---|---|---|---|
| GitHub Pages | Easy | Free SSL, Custom Domain | Personal projects, Portfolios |
| Netlify | Medium | CI/CD, Form handling | Small business websites |
| Vercel | Medium | Serverless functions | Dynamic web applications |
| Firebase | Medium | Database integration | Interactive websites |
Why Building Your Own Website Matters
According to a 2024 survey by Stack Overflow, 70% of professional developers consider fundamental HTML, CSS, and JavaScript skills essential for career growth, even for those specializing in more advanced frameworks. Additionally, the Web Development Insight Report found that nearly 65% of hiring managers prefer candidates who understand core web technologies before specializing.
By creating your own website from scratch, you gain:
- Complete control over design and functionality
- Better understanding of web technologies
- Faster page load times (no bloated code from website builders)
- Valuable skills that transfer to other tech fields
- Pride in building something yourself!
Conclusion
Building a simple website with HTML, CSS, and JavaScript is an achievable goal for anyone willing to learn. By understanding these three core technologies, you’ve gained the foundational knowledge that powers the entire web. As you continue your journey, you can expand your skills to include frameworks, libraries, and backend technologies.
Remember that the best websites evolve over time. Start simple, test regularly, gather feedback, and keep improving. The web development skills you’re building now will serve you well in many aspects of the digital world.
FAQs – How to Build a Simple Website with HTML CSS and JavaScript
How long does it take to build a simple website from scratch?
For beginners, a basic website might take 1-2 days to complete. With practice, you can build simple sites in just a few hours. More complex projects with multiple pages and advanced features can take weeks or longer.
Do I need to know programming to create a website with HTML, CSS, and JavaScript?
While HTML and CSS aren’t traditional programming languages (they’re markup and styling languages), JavaScript is a programming language. You don’t need prior programming experience, but learning the logical thinking behind programming will help with JavaScript.
Can I use HTML, CSS, and JavaScript to create a mobile app?
Yes, you can create Progressive Web Apps (PWAs) using these technologies, which function similarly to native mobile apps. For true native mobile apps, you’d need to learn additional technologies like React Native or Flutter.
Is it better to use a website builder or code from scratch?
Coding from scratch gives you complete control, better performance, and valuable skills. Website builders offer convenience and speed. For learning purposes or unique projects, coding from scratch is often better. For quick business websites with standard features, builders can be efficient.